Roads are special kind of splines used specifically for creating street roads.
Unlike tracks, roads aren't like decals, they do not adapt to terrain surface, they have a thickness.
To access the roads panel click on roads tab in the splines tool panel.
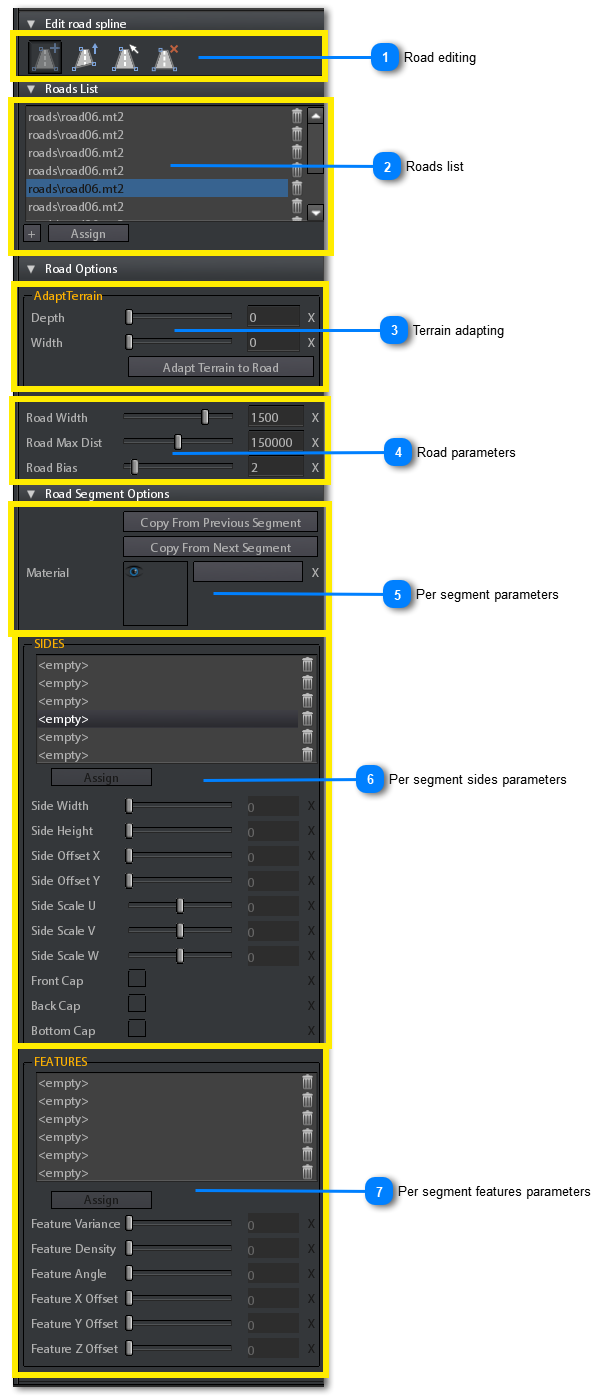
 Road editing
In this section you can edit points of an already created road.
The buttons on this section are radio buttons, this means that a button remains pressed until you click on another button on the toolbar.
-
 Add a new road point Add a new road point
When this button is pressed, every time you press left mouse button on a point of the terrain a new road button is added following the previous one.
If you hold the left mouse button when adding the new point, you can move it on the terrain until you reach the desired position.

The last point of the road is the one you cannot move. If you click on it a new point will be created and moved.

Do not forget to select a road before adding new points.
If you click on an already created point you can simply move it on the terrain as described before.
You can also add a new point between two points already created:
-
 Move road point Move road point
When this button is pressed you can only select and move a point on the road.
You can move it in two ways:
-
Sliding on the terrain: As described when adding a new point, select the point a hold left mouse button while moving.
-
Use gizmos: You can use the point gizmo for moving along one axis separately.
You can move also the up axis gizmo for placing the track point at a certain distance from the terrain surface.
As described below you can then adapt the terrain to the road
-
 Select road point Select road point
Use this button if you want only select a road point. It is useful when you want to select the road point for editing corresponding road segment.
-
 Delete selected road point Delete selected road point
This is the only button that, if pressed, doesn't work as radio.
If you want to delete a road point simply:
-
-
|
 Roads list
Here is where you can create a new road or select / delete an already created road.
To create a new road:
-
Click on  button to add a new slot to the list -
Select the newly created <empty> slot and click on  button. -
Choose the starting material you want to assign to the road from the appearing material browser dialog.
The starting material is a material that will be assigned to all road segments when the road is created.
After you have created the road, you can change every single segment material as you want (see below).
To delete an already created road:
-
Simply click on trash  icon of the road to delete's row.
To select a road click on the related row into the list.
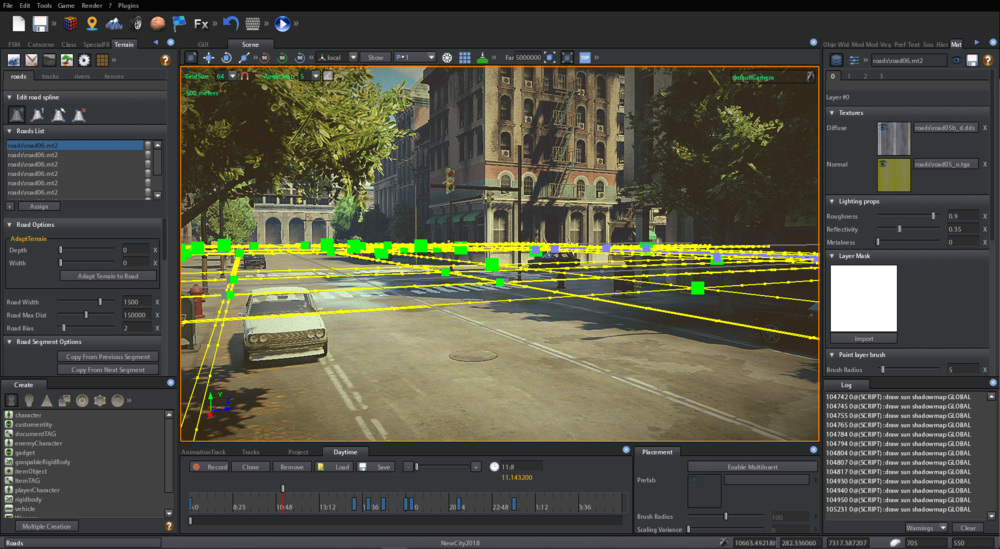
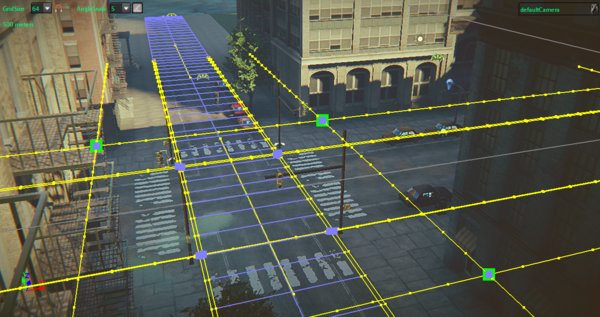
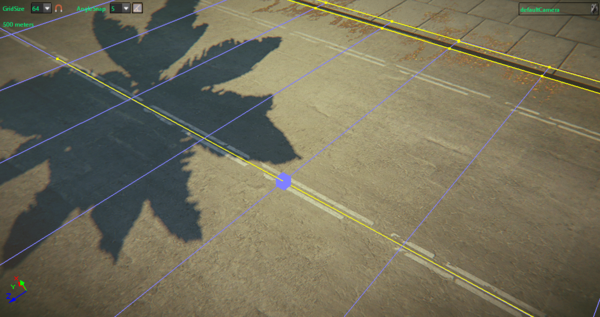
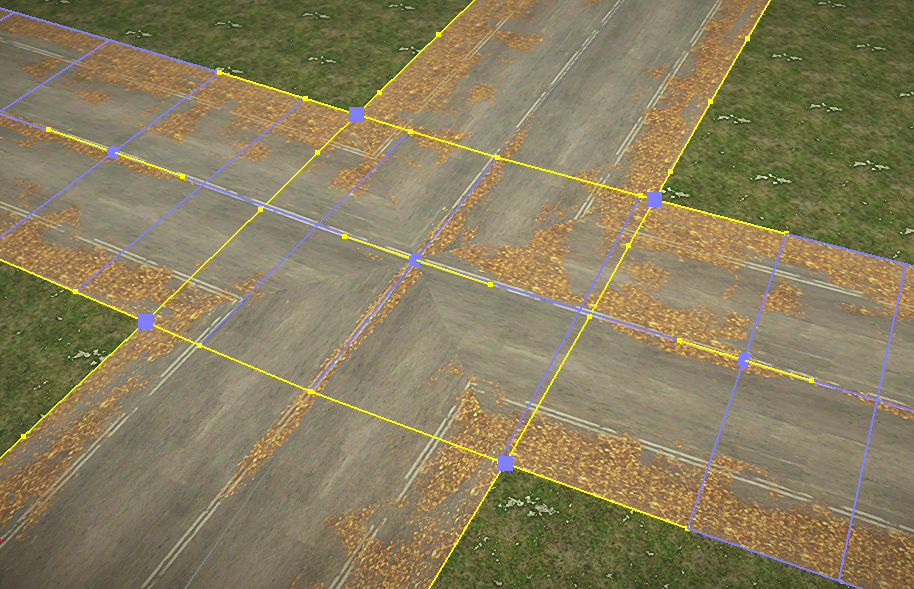
When you open the roads panel, in the scene viewport roads are showed with yellow lines on the external sides. The selected road, instead, is showed with blue section lines connecting yellow side lines.
The road points are showed as blue boxes in the middle of the road section lines.
When you select a road point it becomes yellow.
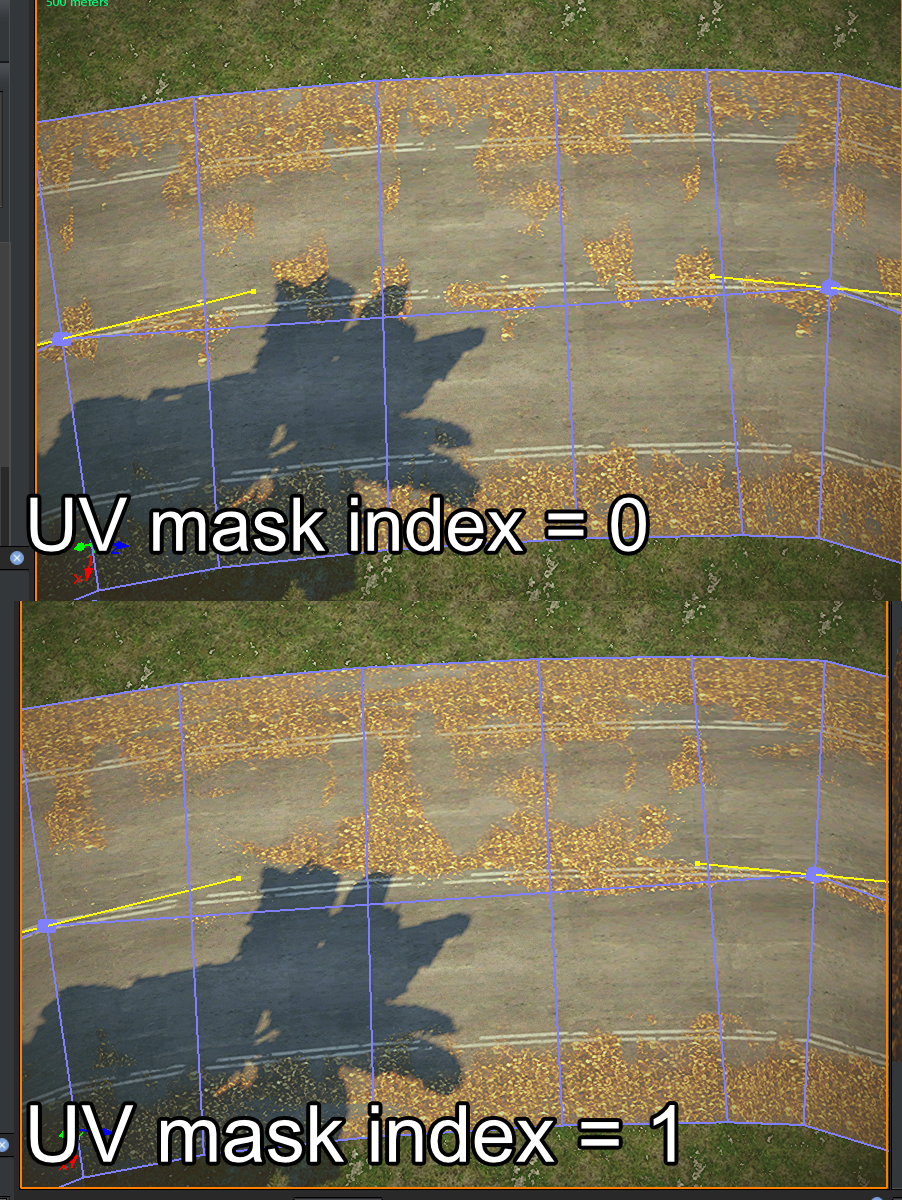
Roads geometry has two UV channels automatically created. The second channel is created with the V coordinate to be a multiple of the V coordinate in the first channel.
This allows you to add a new layer into the road material with a mask tiling that repeats less frequently if it is assigned to the second mask UV channel. The following image shows the leaves layer with UV mask index of the second layer to 0 and UV mask index of second layer to 1, you can note that, in the second case, the mask repeatition is less evident.
|
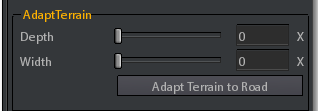
 Terrain adaptingSometimes you could need to elevate or lower the track from the terrain surface.
In this case you can move tracks points up or down and then use the terrain adapting tool to make the terrain following the track elevation.
To do this:
-
Choose the track border width ( width parameter). It is used as tolerance width to avoid artifacts. It can be higher than the real road width. -
Choose the depth ( depth parameter). Depth is the distance that terrain height must have from the road height. If depth is > 0 the terrain will be displaced until it reach a depth distance below the road, otherwise if it is < 0 the terrain will be displaced until it reach a depth distance above the road. -
Click on Adapt Terrain To Road button. -
Adapting border width must be at least half of the track width to avoid artifacts
|
 Road parameters
-
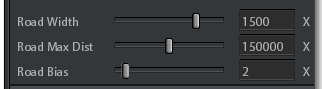
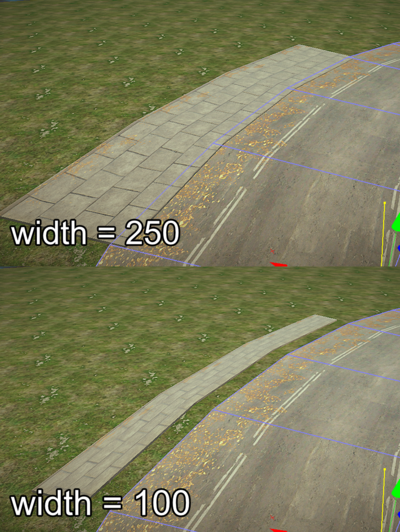
The width of the road in centimeters.
In the case the road has sides (see Per segment sides), if you change the road width using the slider, also sides will be displaced according to the road width, if you change the width using the inputbox, sides position remain untouched. In the following GIF the road width is changed using the slider:
In the following GIF the road width is changed using input box:
-
The maximum distance at which the road can be drawed (in centimeters). It is used for optimization purpouse.
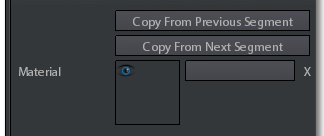
The starting material is a material that will be assigned to all road segments when the road is created.
After you have created the road, you can change every single segment material as you want (see below).
-
This parameter is used to change road thickness and/or avoid z-buffer precision artifacts.
|
 Per segment parameters
The segment of a road is the road geometry between 2 successive points.
Every segment in a road can have its own material applied and other elements attached such as: features and sides
When you add a new point on the end of road, the newly created segment will have the same parameters of the previous one, including sides and features.
See below.
You can set different parameters for every road segment:
The current segment is the segment starting from the current selected point. So to selected the segment you must select the point
|
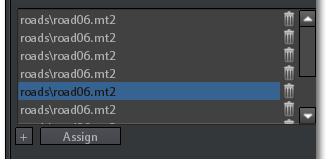
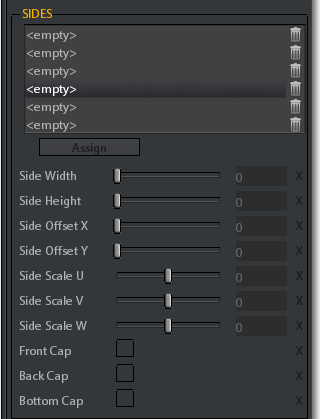
 Per segment sides parameters
A segment can have additional geometry we call sides.
The side of a segment road is an additional spline with a rectangular section that follow the main road spline direction.
Examples of what can be represented with sides are walksides and guardrails.
There can be maximum 6 sides per segment
Every segment side can have its own material.
To create a new side you can follow steps below:
-
Click on an <empty> slot. -
Click on Assign button to assign a material to the side to be created.
To delete an already created side:
-
Simply click on trash icon of the side to delete's row.
Following are all the parameters that can be set for a road segment side:
-
Width of the side.
-
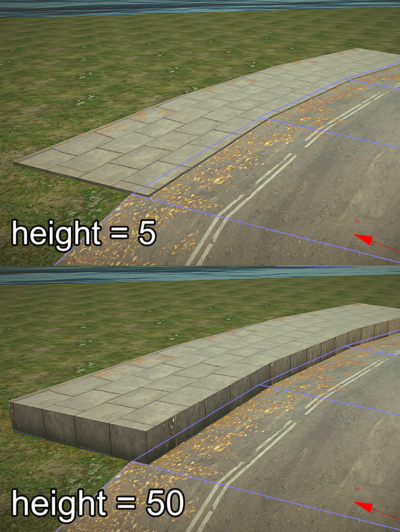
Height of the side.
-
The offset of the side relative to the road segment on horizontal axis.
-
The offset of the side relative to the road segment on vertical axis.
-
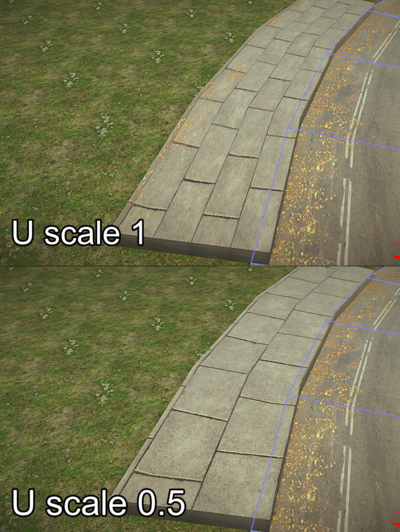
Scale the U texture coodinate of the side. Values > 1 means higher texture repeatition on U coordinate.
-
Scale the V texture coodinate of the side. Values > 1 means higher texture repeatition on V coordinate.
-
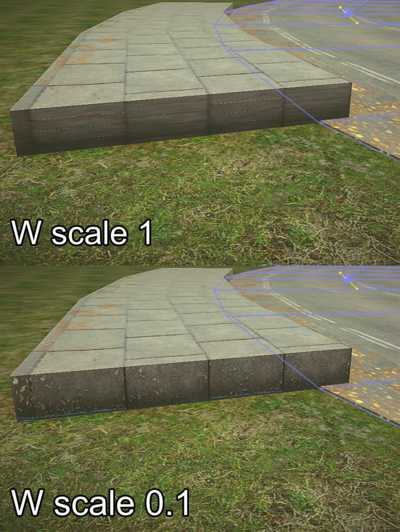
Scale the W texture coodinate of the side. Values > 1 means higher texture repeatition on W coordinate.
-
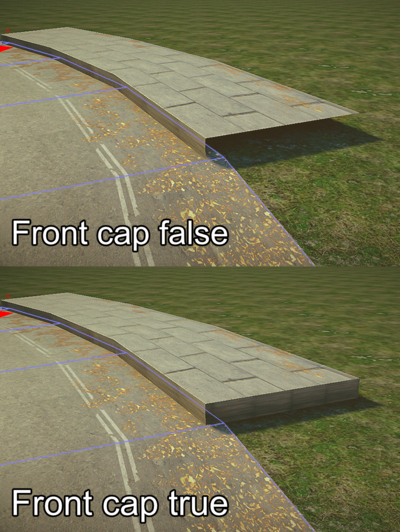
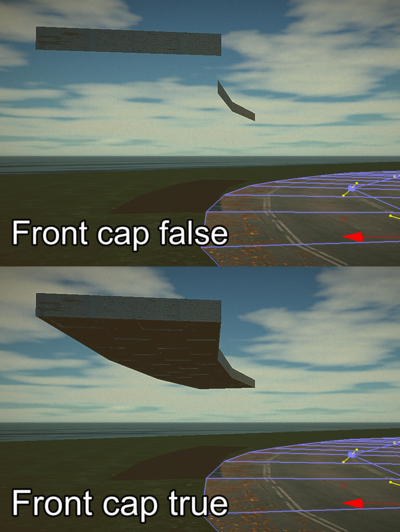
Enable this checkbox to cap the segment frontal face.
-
Enable this checkbox to cap the segment backward face.
-
Enable this checkbox to cap the segment bottom face.
To edit the side of a segment you have to first select the segment.
|
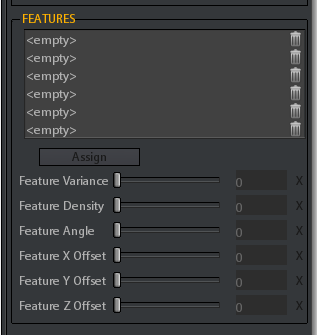
 Per segment features parameters
A segment can have additional array of models we call features.
The feature of a segment road is an array of model instances that follows the road direction.
Examples of what can be represented with features are street lights or street trees.
There can be maximum 6 features per segment
To create a new feature you can follow steps below:
-
Click on an <empty> slot. -
Click on Assign button to assign a model to the side to be created.
To delete an already created feature:
-
Simply click on trash icon of the feature to delete's row.
Following are all the parameters that can be set for a road segment feature:
-
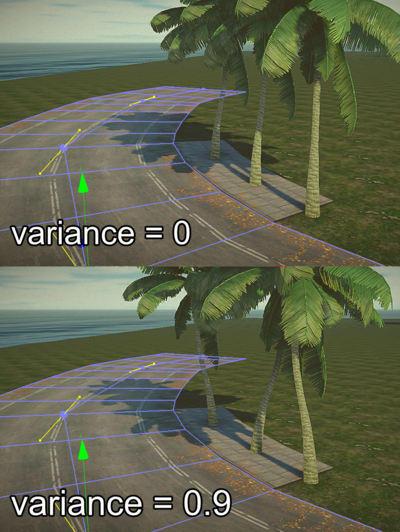
The random variance of feature instances rotation. Values from 0 to 1.
-
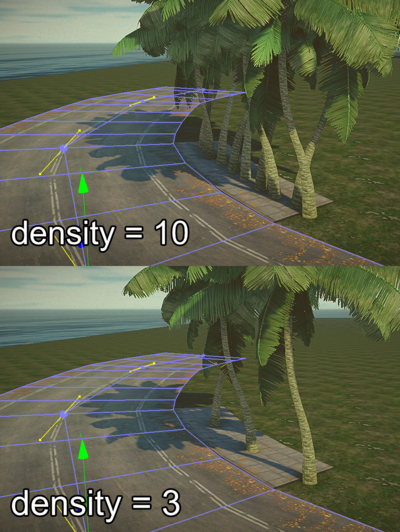
The density, i.e. the number, of feature instances on a single segment.
-
The rotation of segment feature instances. If you use variance this will be the starting rotation from which the variance is computed.
-
The offset of the feature relative to the road segment on horizontal axis.
-
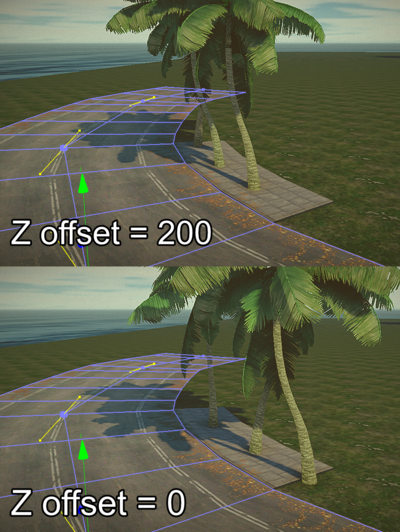
The offset of the feature relative to the road segment on vertical axis.
-
The offset of the feature relative to the road segment on direction axis.
To edit the feature of a segment you have to first select the segment.
|
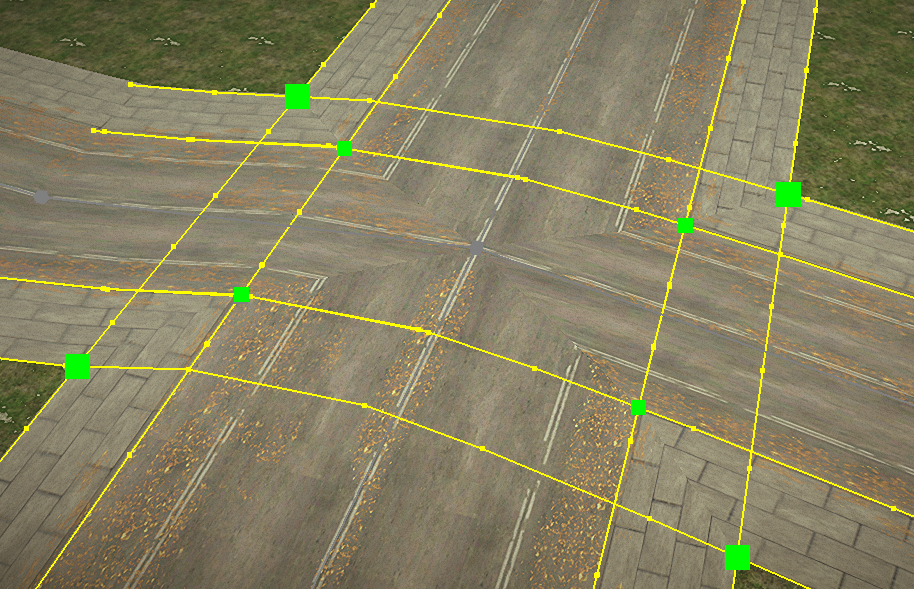
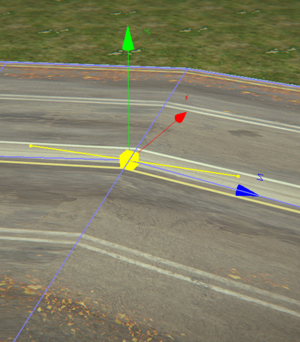
Two roads can be intersected.
In this case their geometry will be mixed in order to form a continuous street surface.
To create a road intersection:
-
-
- Make them to form a cross -
- Move one point of a road on another point of the other road (the point in which you want to create the intersection).
Every time you modify the parameters of one road of the intersection, for example road width or sides, or you change the position of the road points, you have to click on the intersection point to apply the changes:
If the roads have sides, they are also intersected.
For avoiding artifacts be sure both intersecting roads have sides, and sides have the same height
In this case the intersection points of the sides will be showed in green:
For avoiding artifacts be sure the intersecting roads be on a plain surface and take care the intersecting segments be long enough
|


 Every time you modify the parameters of one road of the intersection, for example road width or sides, or you change the position of the road points, you have to click on the intersection point to apply the changes:
 If the roads have sides, they are also intersected.