To access the material tool Select the material icon tool
or click Tools->MaterialEd on the main menu.
S2ENGINE HD editor lets you to create new materials or modify the existing ones.
Creating new material
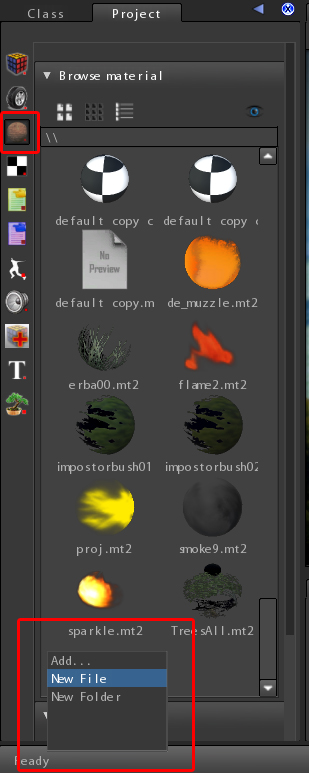
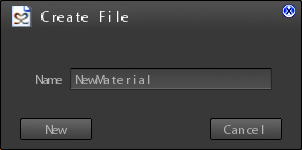
You can create a new material from Materials browser in the Project manager tool (see the image). Select the folder (in the browser) in which you want to put the new material resource file and then right click the mouse and select New File. The create file dialog appears as showed in the picture below. It lets you to specify the name of the new file to create.
Inspecting existing material
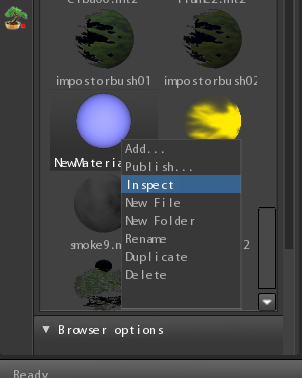
If you want to edit an existing material you can select it from the scene (see next paragraphs) but also select it from the material browser. In this last case right click the mouse on the icon of the material you want to edit and choose Inspect, as showed into the following image:
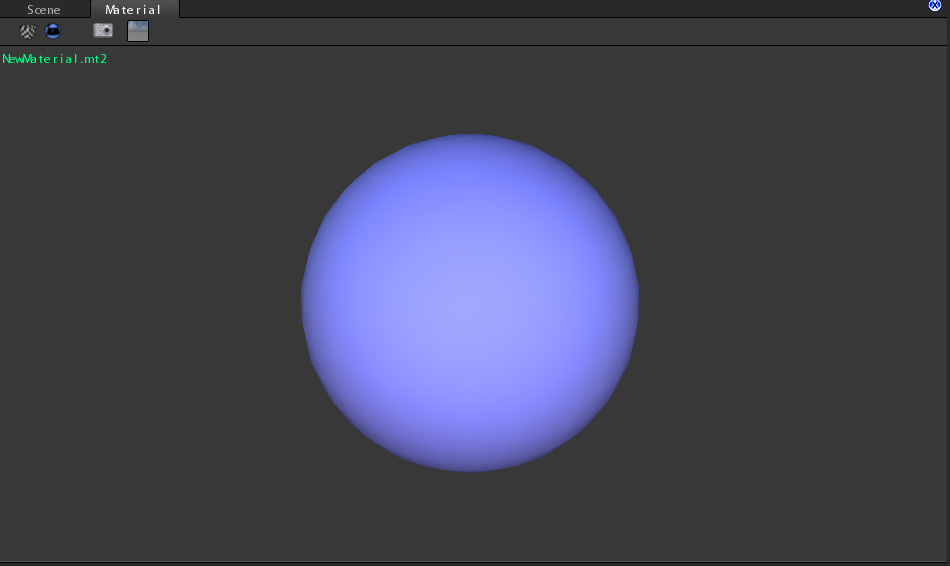
When clicking on Inspect the material is showed into the material viewport and material tool.
Editing materials
You can edit material using the material tool in two ways:
- Directly on the object into Scene Viewport
- Using the Material Viewport
- Select material in scene
If you are editing a game scene you can also select material to edit directly from scene.
- First show the material editor tool, material viewport will be also showed
- Select the scene viewport (to show the scene)
- Click on the object and on the material of the object you want to edit, you will see material tool showing selected material properties.
- Attention
- NOTE that this can be done only for static meshobjects
Material Viewport
It displays the current selected material. It is useful to edit and also paint layers (see next paragraphs) on it. For more infos about material viewport see viewports
Editing Layers
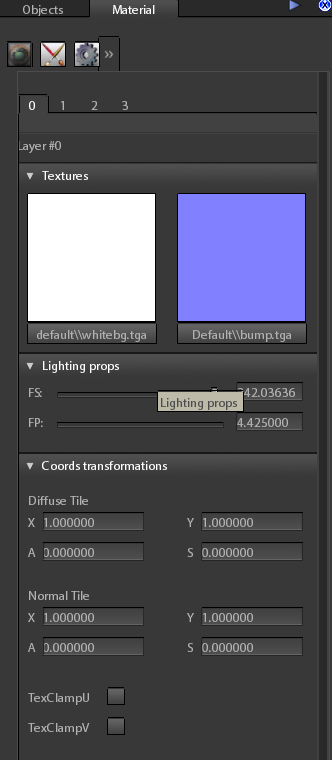
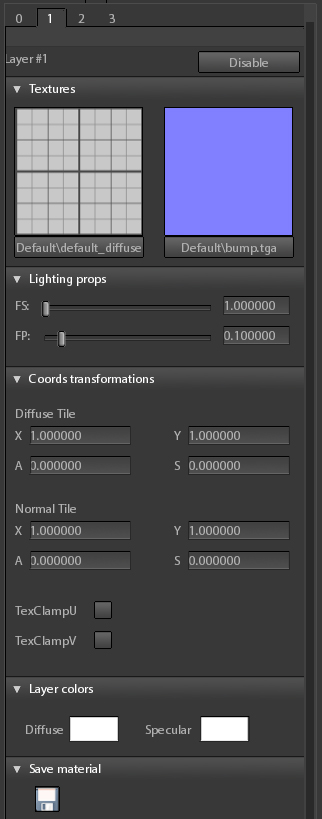
Every material can have up to 4 layers. Every layer has a diffuse map and a normal map. Layer are blended together using a 3-channels mask texture. Every channel of the mask texture contains the opacity value of the corresponding layer: values goes from 0 ( means layer completely transparent), 1 (layer completely opaque). NOTE that layer 0 hasn’t a mask channel because it is always visible. To edit layers click on the layers tab icon mat_tool11 As you can see in the next image, layers are numerated from 1 to 4 and they can be selected by corresponding tabs of the layers tool. To enable/disable a layer click on the enable/disable button on the top right of the layer tab box. Every layer texture has its own properties as showed in the picture on the left.
- FS: glossiness coefficient. To make the layer more/less gloss(hard) move the FS slider. Values can be from 0.0 (completely matte) to 256.0 (completely metallic).
- FP: specular coefficient. To make the layer more/less specular move the FP slider. Values can be from 0.0 (no specular reflection) to 1.0 (completely specular).
- Diffuse Tile: Manage the tiling and scrolling of the color texture
- X: horizontal tiling
- Y: vertical tiling
- A: orientation of the texture scrolling. Works if scroll speed is > 0
- S: Scroll speed of the texture
- Normal Tile: Manage the tiling and scrolling of the normal texture
- X: horizontal tiling
- Y: vertical tiling
- A: orientation of the texture scrolling. Works if scroll speed is > 0
- S: Scroll speed of the texture
- TexClampU: U(horizontal) coordinate clamping.
- TexClampV: V(vertical) coordinate clamping.
- Diffuse Color: Color of the albedo (diffuse) reflection of material.
- Specular Color: Color of the specular reflection of the material (doesn’t work for now).
- Attention
- NOTE: Do not forget to press return to apply changes after write into the input boxes. Not all material/objects can support texture scrolling. this feature depends on material/object shader. Do not forget to save material after applying changes by clicking on the Save Material icon.
Painting layers
As said materials can have one or more layer. Layers are superimposed and blended using a layer mask. But how to blend a layer with the one below? You have to paint it using the paint tool. The following are the steps needed to paint a layer:
- Choose the layer to paint by clicking on the layer number tab
- Click on the layer paint icon
- Set the paint brush properties (radius, hardness, strength)
- Hold left mouse button and move cursor on the material surface to paint.
- Attention
- NOTE: Do not forget to save material after applying changes by clicking on the Save Material icon.
Material properties
In addiction to layers Materials have also other properties. To edit material properties click on the icon
You can set various parameters that change the whole material behaviour. These parameters are grouped into:
Rendering Properties
- Alpha Test: Parts of the surface are discarded basing on the alpha channel of the first layer color texture
- Alpha Blend: Opacity of the material is based on alpha channel of the first layer color texture
- Blend Func:
- Two Sided: The surface is visible front and back
- Refract: The surface is refractive
- Refract Pow: The amount of refraction distortion basing on normal map of first layer
- Refract Dns:
- Emit: The material emit list
- Emit Pow: The amount of emission power
- Emit Color: The color of the light emitted
- Emit Map: A texture map defining the what part of the material are emissive (white) and what not (black)
- Alpha Level: The amount of opacity of surface (works when alpha blend or alpha test are enabled)
- Scattering: The subsurface scattering amount
- Back Scattering: The subsurface scattering amount when light come from back (it simulate the thickness of the surface)
- Thickness map: It is a grey scaled texture map used with back scattering. White is max thickness, black is minimum.
- Reflection: the reflections multiplier, higher values mean more reflective material. It also enhances material specular shininess.
- IsDecal: The surface is a decal (decal haven’t normal map)
- DecalNormal: The surface is a decal that own also a normal map (works only if IsDecal is set)
- IsWaterDecal: The surface is a decal that is applied on water surface
- MacroBump:
- MacroDiff:
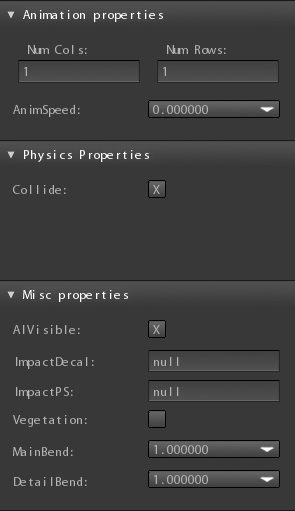
Animation properties
Physics properties
Miscellaneous properties
- AIVisible:
- ImpactDecal:
- ImpactPS:
- Vegetation: The material reacts to the wind. It is applied especially to trees and plants.
- MainBend: Main bending of the material (trunk bending) if it reacts to the wind. (works only if vegetation is set)
- Detail Bend: Detail bending (leaves bending) of the material if it reacts to the wind. (works only if vegetation is set)
- Attention
- NOTE: Do not forget to save material after applying changes by clicking on the Save Material icon.


