Quick Start With S2ENGINE HD 1.4.0 – part 2
In the previous tutorial we showed how to create a new project from scratch, how to create a new scene in the project and how to start working with terrains.
In this tutorial we’ll show how to manage texture resources and add base texture to our terrain.
As you can note when you create a new project it doesn’t contain any resource except main.sc2 script. So to start painting terrain first we have to import texture resources into the project.
We can import textures into 2 ways.
Let’s start with the first.
Go to the texture resources browser and click right mouse button, a popup menu will appear, as showed in the following image:

Click “Add…”, a file dialog will appear. It lets you to choose the texture to import and click on open button.
NOTE that the supported texture file formats are tga and dds.

This method lets you to import single texture files, but What if you want to import more textures in a single operation? Asset importing is what we need…
Let’s go to the second method.
Suppose you have a folder in which you have a bunch of textures, you can import into the project all the textures contained into this folder in a single operation.
NOTE that you can also import subfolders.

Click on Edit->Project->ImportAsset as showed into the picture above.
A file dialog will appear: choose the folder in which you have the textures to import and click on open as showed in the following image.

When textures are imported you see them inside the textures resource browser:
Now that we have some textures to use, lets start to paint our terrain.
Click on the paint tab of the terrain tool. You will see something like that:

The terrain shader is composed by 4 texture layers (each composed by a diffuse and a normal texture). The first layer is also blended, basing on slope and height, by another texture that we call “Base Texture“.
Generally Base texture is useful to easly and automatically obtain a simple grass/sand (or something like that) layer upon rocks basing on terrain slope/height.
Click on the loadbasetex button (showed above) and choose the texture you want to use as base. the result you will obtain will be something like this:

NOTE that added texture do not influence terrain in certain points where slope is high.
You can control this effect by playing with Slope and Height params of the base texture (see image below).

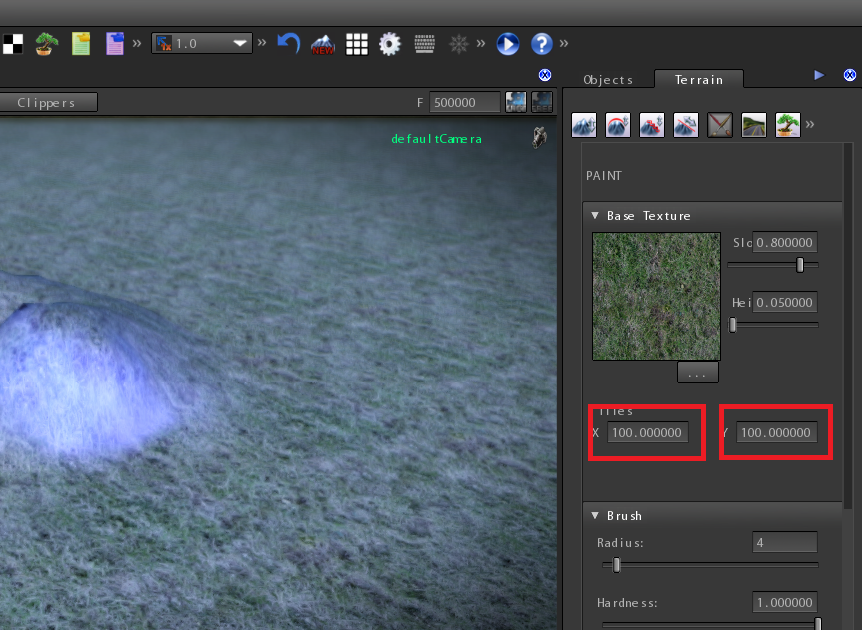
As you can note the texture on the terrain has a too low resolution, you can control base texture titling by setting the Tiles params:

Now your base texture layer looks better.
In the next tutorial we will show how to set the other terrain layers and how to paint them.
Stay tuned guys!


No Comments